- Posts: 102
- Thank you received: 2

ACMOC Membership Benefits
- FREE quarterly magazine filled with content about antique Caterpillar machines
- FREE classified listings
- ACMOC store discounts and specials
- Full Bulletin Board Access
- Marketplace (For Sale/Wanted)
- Technical Library
- Post attachments
$44 /year ELECTRONIC
$60 /year USA
$77 /year International
- Forum
- Antique Caterpillar Machinery Owners Club
- DISCUSSION
- 933 Traxcavator d311 engine coolant level changes....head drains
933 Traxcavator d311 engine coolant level changes....head drains
4 years 6 months ago #213256
by rehpig
No I didn't.... I will have to rig up a cross clamp tomorrow and do that. How much pressure should I apply?
Replied by rehpig on topic 933 Traxcavator d311 engine coolant level changes....head drains
Try 5H0957, computerized part number look for four digit numbers.
On checking liner protrusion, did you have the liners clamped down in there bores before measuring?
No I didn't.... I will have to rig up a cross clamp tomorrow and do that. How much pressure should I apply?
Please Log in or Create an account to join the conversation.
- Old Magnet
-

- Offline
- Platinum Boarder
- Member
Less
More
- Posts: 16175
- Thank you received: 504
4 years 6 months ago #213291
by Old Magnet
Replied by Old Magnet on topic 933 Traxcavator d311 engine coolant level changes....head drains
Around 40 to 50 ft. lbs torque using the head studs should do it.
Please Log in or Create an account to join the conversation.
4 years 6 months ago #213310
by restore49
Please Log in or Create an account to join the conversation.
4 years 6 months ago #213381
by rehpig
Replied by rehpig on topic liner update
Well, this is where I am at. Did liner protrusion check. Dilemma .0015 thousand clearance. Liners look quite good to my eye. All are quite the same. Held down the liner and used a straight edge on liner using feeler gauge. Used the thinnest gauge .0015 and could get it to move under the edge. Am I screwed and need to pull out the liners? I did find an obvious location for the leaking into the coolant. Number one cylinder between the push rods. That seal had failed and the gap between the liner and the block was completely filled. No other location had any debris in that groove between the liner and the block. Gasket that I removed did not have any sealer on it. I have all new parts coming, gasket, seals farrenls etc. including Permatex 300. Also, I need two 1/2 studs and one of the center smaller ones. Part book calls out 4f6328 and 3f103. Those don't come up in any google searches. Thanks in advance for sharing your knowledge.
Please Log in or Create an account to join the conversation.
4 years 6 months ago #213386
by restore49
Replied by restore49 on topic 933 Traxcavator d311 engine coolant level changes....head drains
Very easy to pull out - also nice to clean in the block cavity and replace O-ring. Mine were all low. Bob
Please Log in or Create an account to join the conversation.
4 years 6 months ago #213387
by neil
Cheers,
Neil
Pittsford, NY
Replied by neil on topic 933 Traxcavator d311 engine coolant level changes....head drains
Do you drape some paper towels over the crank to stop the crud landing on it as you pull the liner out? Is that sufficient?
Cheers,
Neil
Pittsford, NY
Please Log in or Create an account to join the conversation.
4 years 6 months ago #213388
by rehpig
So the process would be to remove the Oil Pan. Does this come off without removing the cross over member? This is a 933 and does not have the spring set, just a solid cross over.
Oil pump removal? Any thing to access/do here?
Remove rod ends
Piston / Rod combination removed thru the top? Do the rod ends fit through the piston sleeve?
Remove the sleeves with a special puller?
Will need to order what parts? Just the shims? Copper or Stainless steel?
Are the rings conceivable to be reused?
Since all the sleeves are virtually flush would I just need to order just the standard .007 copper ring? Or do I need to take it apart first and assess the thickness after and order ring after removal?
If this is it and I will end up with a proper job sound like its the way to go.
Replied by rehpig on topic 933 Traxcavator d311 engine coolant level changes....head drains
Very easy to pull out - also nice to clean in the block cavity and replace O-ring. Mine were all low. Bob
So the process would be to remove the Oil Pan. Does this come off without removing the cross over member? This is a 933 and does not have the spring set, just a solid cross over.
Oil pump removal? Any thing to access/do here?
Remove rod ends
Piston / Rod combination removed thru the top? Do the rod ends fit through the piston sleeve?
Remove the sleeves with a special puller?
Will need to order what parts? Just the shims? Copper or Stainless steel?
Are the rings conceivable to be reused?
Since all the sleeves are virtually flush would I just need to order just the standard .007 copper ring? Or do I need to take it apart first and assess the thickness after and order ring after removal?
If this is it and I will end up with a proper job sound like its the way to go.
Please Log in or Create an account to join the conversation.
4 years 6 months ago #213393
by restore49
Replied by restore49 on topic 933 Traxcavator d311 engine coolant level changes....head drains
From old memory
Unbolted cross member -3 3/4" bolts top each side - pulled the greased center pin and jacked up front motor high enough to clear oil pan???
Big end will not go threw sleeve - think I pushed the rod up and then pried with wood and sleeve and piston came out
Or maybe remember I could wiggle the heavy piston (with gloves on) out the bottom?
I cleaned the pistons - rings looked good.
Ordered shims after all clean with O-ring off clamped down and remeasured protrusion.
4F3792 is the number for the copper Gaskets(Shims)
My sleeves came out pretty easy - if not long threaded rod from top with big washer on the bottom just wide enough to catch edge sleeve.
Do cover crank as suggested to prevent dirt intrusion particularly the oil passages.
Please Log in or Create an account to join the conversation.
- Old Magnet
-
- Offline
- Platinum Boarder
- Member
Less
More
- Posts: 16175
- Thank you received: 504
4 years 6 months ago #213403
by Old Magnet
Replied by Old Magnet on topic 933 Traxcavator d311 engine coolant level changes....head drains
Tear it down and check counter bores before ordering shims. There is a reason the liners are down, usually do to fretting and erosion and may require re-cutting the counter bores. Piston rings may or may not be reusable depending on wear and end gaps. Also check piston ring land clearances, especially for the top compression ring/s, there usually the ones that wear out of spec.
Please Log in or Create an account to join the conversation.
4 years 6 months ago #213412
by rehpig
Replied by rehpig on topic 933 Traxcavator d311 engine coolant level changes....head drains
Here are a few pictures of the oil pan/ cross over. From my assessment. The center pin is loose and removable. Although it looks like the four horizontal bolts per side look like the obvious choice to remove the crossover I am a little worried that it won’t separate???? Other option looks like removing the frame brackets that they are held with three bolts....actually two bolts each side as each side is missing one bolt each. Here are a few pics. BTW. I have safety first and foremost 1 1/2” solid pins in each side front radiator guard as well as steel spacers in the pistons and I have my forklift forks under and partially supporting the weight of the bucket.
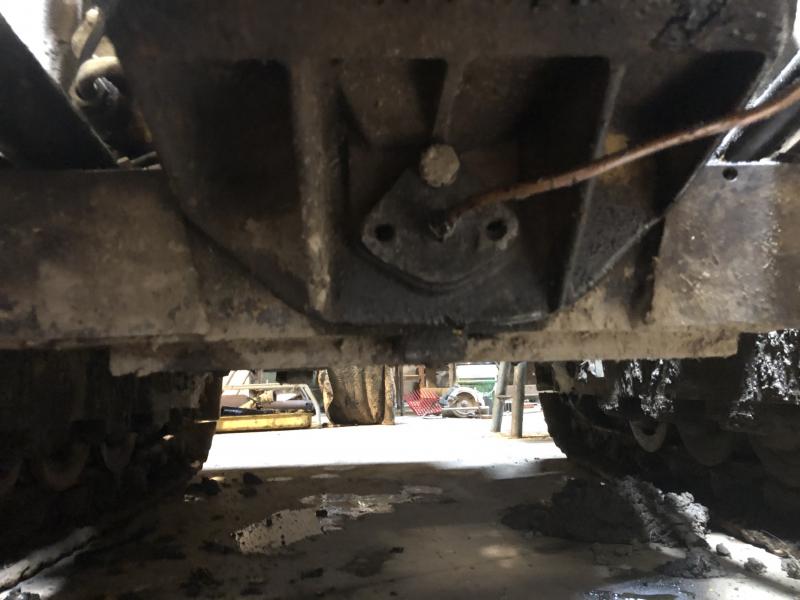
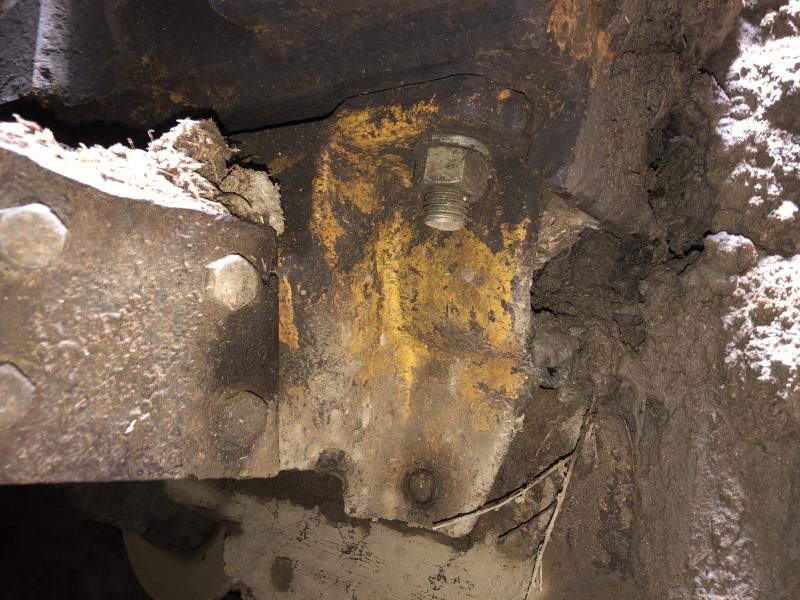
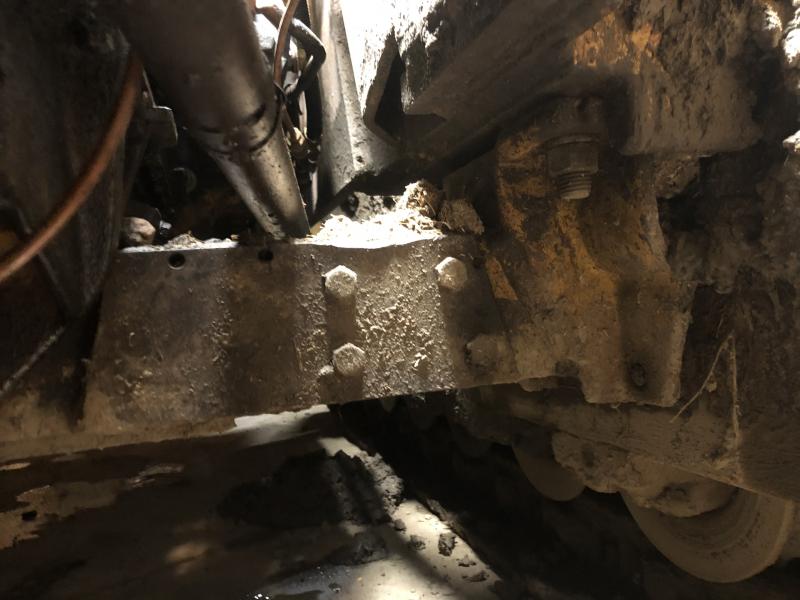
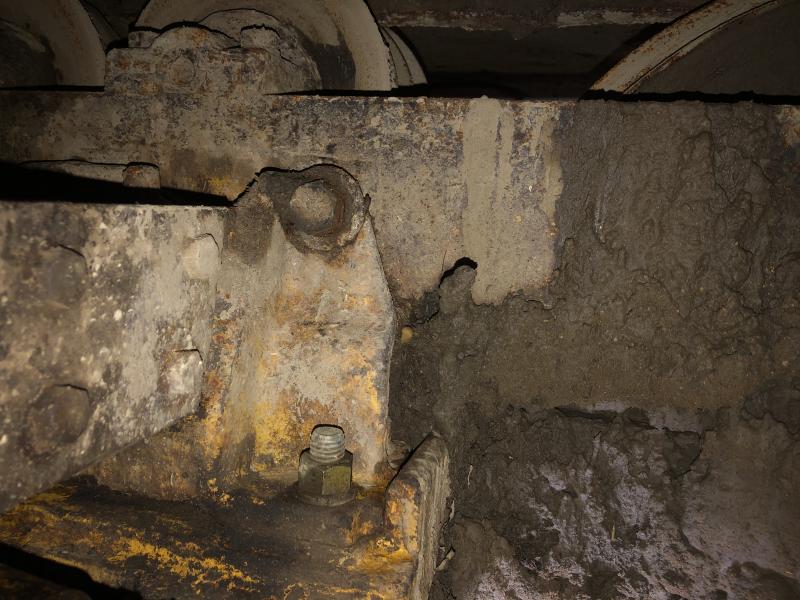
For what it’s worth, it looks like the pan would them be able to just lower without raising the engine. Thoughts?
For what it’s worth, it looks like the pan would them be able to just lower without raising the engine. Thoughts?
Please Log in or Create an account to join the conversation.
- Forum
- Antique Caterpillar Machinery Owners Club
- DISCUSSION
- 933 Traxcavator d311 engine coolant level changes....head drains
Time to create page: 0.383 seconds
ACMOC
Antique Caterpillar Machinery Owners Club
P.O. Box 9301
Peoria, IL 61612
(309) 691-5002
cat@acmoc.org
Become a Member!
"I became a member recently because the wealth of knowledge here is priceless."
- Chris R
"I also joined a year ago. had been on here a couple of times as a non-member and found the info very helpful so I got a one year subscription (not very expensive at all) to try it out. I really like all the resources on here so I just got a three year. I think its a very small price for what you can get out of this site."
- Jason N