- Posts: 1179
- Thank you received: 183

ACMOC Membership Benefits
- FREE quarterly magazine filled with content about antique Caterpillar machines
- FREE classified listings
- ACMOC store discounts and specials
- Full Bulletin Board Access
- Marketplace (For Sale/Wanted)
- Technical Library
- Post attachments
$44 /year ELECTRONIC
$60 /year USA
$77 /year International
- Forum
- Antique Caterpillar Machinery Owners Club
- DISCUSSION
- D2-5U13753 - master pins - please check my understanding
D2-5U13753 - master pins - please check my understanding
6 years 7 months ago #178309
by d2gary
Replied by d2gary on topic Home made sprocket press
Here's what the neighbor and I came up with.
Used the nut off the sprocket and turned down the flats, welded a piece of tube to it. 1/2 inch plate with a grade 8 nut tack welded to it and welded to the tube. Outer tube just fits over the inner and contacts the sprocket. There's an inch of travel for the outer tube to push on the sprocket
Used the nut off the sprocket and turned down the flats, welded a piece of tube to it. 1/2 inch plate with a grade 8 nut tack welded to it and welded to the tube. Outer tube just fits over the inner and contacts the sprocket. There's an inch of travel for the outer tube to push on the sprocket
Please Log in or Create an account to join the conversation.

6 years 7 months ago #178317
by neil
Cheers,
Neil
Pittsford, NY
Replied by neil on topic D2-5U13753 - master pins - please check my understanding
Looks good Gary. I was about to do the same then realized that I could use my 17t puller bar with some stacked nuts for the same purpose that you're using your larger tube. I bought a nut from Fastenal and perquisited an offcut from my guy which I'll weld together on the weekend. I also already had the 3/4 x 13" Grade 8 bolt I used for installing the steering hubs so I should be good to go. I can also use the puller bar either manually or with the push-pull ram to remove the sprocket. Next thing on the list is an arrangement to pull the plugs from the master pins. I've been busy drilling larger and larger holes in the brake anchor shaft because it is STUCK in there. The previous owner must have friction welded it in place because it's not coming out. I have a couple of cans of freeze spray coming to hopefully shrink it enough to move. I could have left it like that but couldn't bear the though of having to pull the final if I had an issue requiring removal of the brake anchor (plus I don't like nuts and bolts that don't undo....)
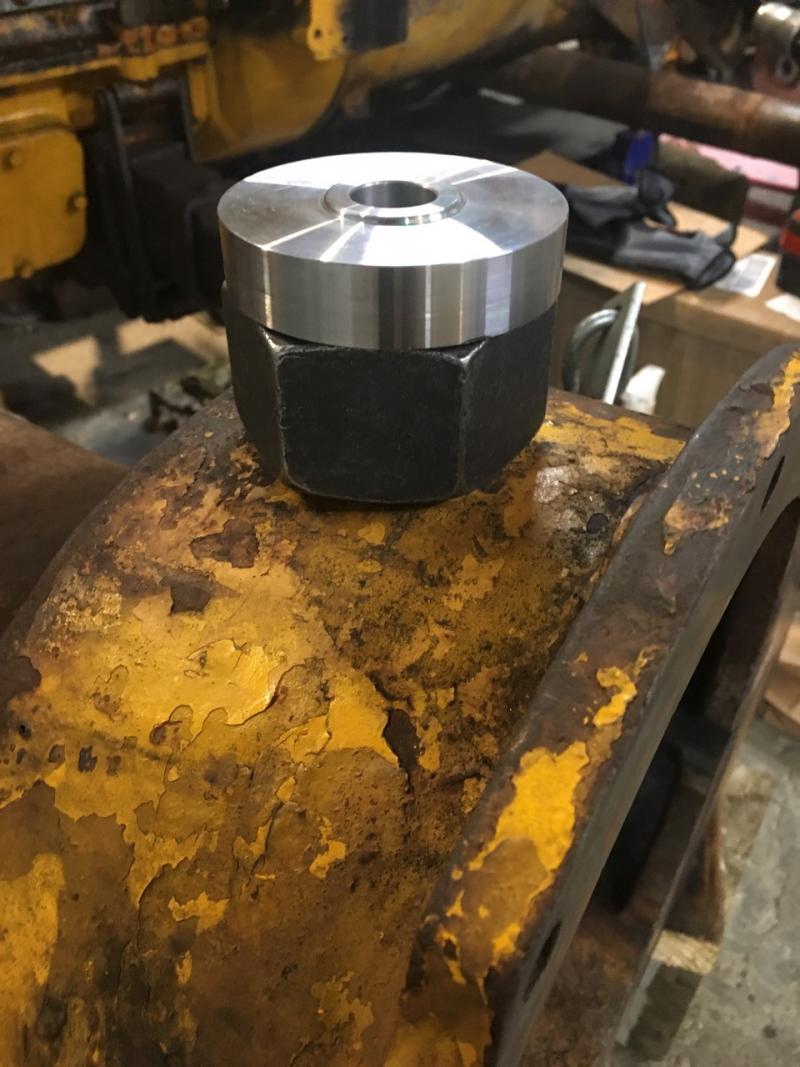
Nut for end of sprocket shaft with a piece of gear grade 1/2 with the 3/4 hole:
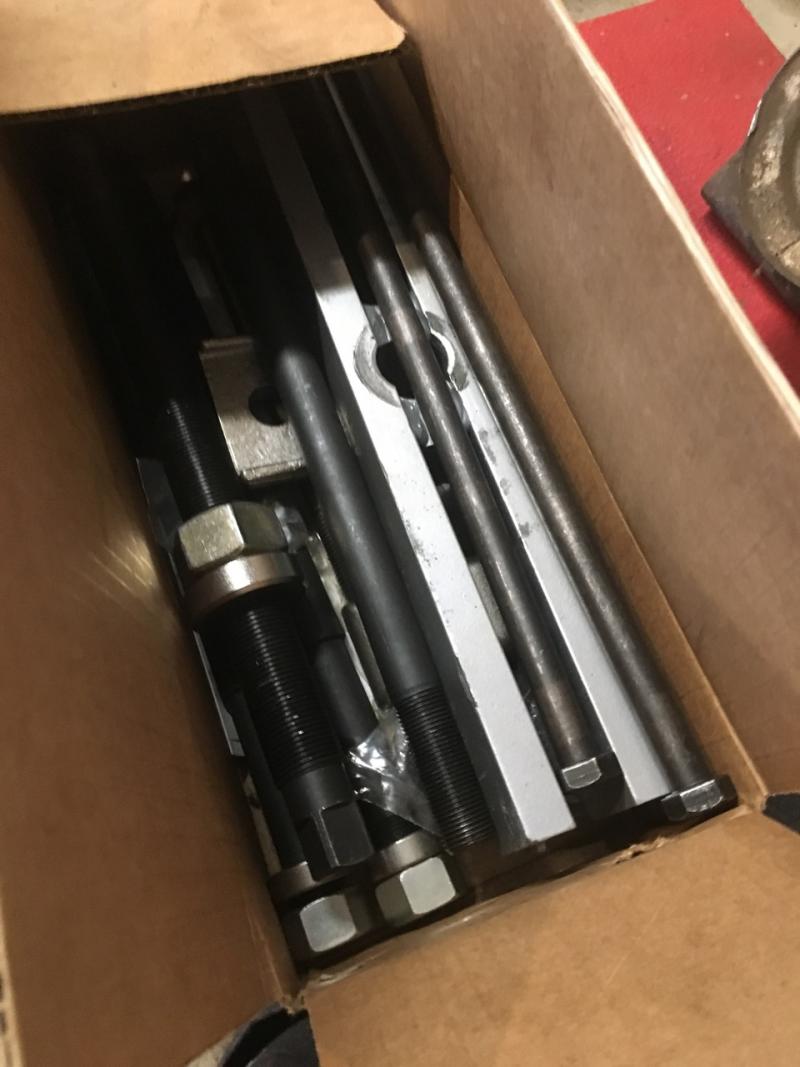
Puller bar that I'll stack off the sprocket with 3/4 nuts stacked on a couple of 1/2-13 bolts, and then sit the hollow ram on top of:
Nut for end of sprocket shaft with a piece of gear grade 1/2 with the 3/4 hole:
Puller bar that I'll stack off the sprocket with 3/4 nuts stacked on a couple of 1/2-13 bolts, and then sit the hollow ram on top of:
Cheers,
Neil
Pittsford, NY
Please Log in or Create an account to join the conversation.
6 years 7 months ago #178318
by neil
Cheers,
Neil
Pittsford, NY
Replied by neil on topic D2-5U13753 - master pins - please check my understanding
Also enquired about some new rail links, bushings, etc. to extend the new 30-link chains to 32 links and then put them on the 5U instead of the 3J. Idea is that I won't have to grind anything down if it's all new. Of course, none of these parts are available new from Cat so it's off to Dana I go...
Cheers,
Neil
Pittsford, NY
Please Log in or Create an account to join the conversation.
6 years 7 months ago #178323
by d2gary
I guess there really is more than one way to skin a CAT
Those adapters look good.
My 5j brake shafts were really stuck also but mine weren't stuck in the case they were stuck on the break linkage.
If you hold your tongue just right and all the stars line up you can get all the pins out of the linkage and remove the break band. I was able to heat and cool the piece on the brake shaft. It took a lot of heat and several cycles but I finally got it. Might be worth a try
Replied by d2gary on topic D2-5U13753 - master pins - please check my understanding
Looks good Gary. I was about to do the same then realized that I could use my 17t puller bar with some stacked nuts for the same purpose that you're using your larger tube. I bought a nut from Fastenal and perquisited an offcut from my guy which I'll weld together on the weekend. I also already had the 3/4 x 13" Grade 8 bolt I used for installing the steering hubs so I should be good to go. I can also use the puller bar either manually or with the push-pull ram to remove the sprocket. Next thing on the list is an arrangement to pull the plugs from the master pins. I've been busy drilling larger and larger holes in the brake anchor shaft because it is STUCK in there. The previous owner must have friction welded it in place because it's not coming out. I have a couple of cans of freeze spray coming to hopefully shrink it enough to move. I could have left it like that but couldn't bear the though of having to pull the final if I had an issue requiring removal of the brake anchor (plus I don't like nuts and bolts that don't undo....)
Nut for end of sprocket shaft with a piece of gear grade 1/2 with the 3/4 hole:
Puller bar that I'll stack off the sprocket with 3/4 nuts stacked on a couple of 1/2-13 bolts, and then sit the hollow ram on top of:
I guess there really is more than one way to skin a CAT
Those adapters look good.
My 5j brake shafts were really stuck also but mine weren't stuck in the case they were stuck on the break linkage.
If you hold your tongue just right and all the stars line up you can get all the pins out of the linkage and remove the break band. I was able to heat and cool the piece on the brake shaft. It took a lot of heat and several cycles but I finally got it. Might be worth a try
Please Log in or Create an account to join the conversation.
6 years 7 months ago #178336
by drujinin
After seeing these two works of Art, I won't even post another photo of mine! There is a photo of it somewhere here already?
Replied by drujinin on topic Very Nice!
Here's what the neighbor and I came up with.
Used the nut off the sprocket and turned down the flats, welded a piece of tube to it. 1/2 inch plate with a grade 8 nut tack welded to it and welded to the tube. Outer tube just fits over the inner and contacts the sprocket. There's an inch of travel for the outer tube to push on the sprocket
After seeing these two works of Art, I won't even post another photo of mine! There is a photo of it somewhere here already?
Please Log in or Create an account to join the conversation.
6 years 7 months ago #178361
by neil
Cheers,
Neil
Pittsford, NY
Replied by neil on topic D2-5U13753 - master pins - please check my understanding
Gary's is definitely the piece of art - mine is just a nut and a plate with a hole in it, much like my fine self : )
I did try multiple heating strategies on that brake anchor shaft (the one that's retained with a small plate / lock on the outside). What's in there now is not original because it has a hex head on the outside so I also did try "undoing it" as if it were a bolt. I don't think it is because as far as I can tell, the diameter going into the case is no larger. In any case, it doesn't undo so I'm slowing working my way up the drill bit sizes. Made it to 3/8 with my hand drill and those 12" black oxide Irwin bits - getting pretty good at feed rate ; ) Have a 7/16 and 1/2. After that I'm not sure what I'll do as 1/2 is the largest that Irwin make in that length. I've been drilling from the inside end because I cut the shaft to remove the anchor lever, which helpfully left a 1" piece on the inside end that I can use to get my alignment set on the 4 1/2" piece that is on the outer side.
I did try multiple heating strategies on that brake anchor shaft (the one that's retained with a small plate / lock on the outside). What's in there now is not original because it has a hex head on the outside so I also did try "undoing it" as if it were a bolt. I don't think it is because as far as I can tell, the diameter going into the case is no larger. In any case, it doesn't undo so I'm slowing working my way up the drill bit sizes. Made it to 3/8 with my hand drill and those 12" black oxide Irwin bits - getting pretty good at feed rate ; ) Have a 7/16 and 1/2. After that I'm not sure what I'll do as 1/2 is the largest that Irwin make in that length. I've been drilling from the inside end because I cut the shaft to remove the anchor lever, which helpfully left a 1" piece on the inside end that I can use to get my alignment set on the 4 1/2" piece that is on the outer side.
Cheers,
Neil
Pittsford, NY
Please Log in or Create an account to join the conversation.
6 years 7 months ago #178366
by d2gary
Replied by d2gary on topic D2-5U13753 - master pins - please check my understanding
Thanks for the compliments. My final product would have functioned the same but once my neighbor gets involved the finished product is usually a lot prettier. His nickname is Marcus meticulous and he has the nice lathe. I just asked for a flat shoulder to weld the tube to and he took off with the pieces and came back with this beauty. I did however come up with the design and painted it.
Neil don't know how comfortable you are with a cutting torch but usually once you have a hole all the way through you can blast the shaft out. The case will absorb the heat and the shaft will heat faster. If your careful you can blow out the shaft with no damage to the case. I've done this on various things in the past with good success
Neil don't know how comfortable you are with a cutting torch but usually once you have a hole all the way through you can blast the shaft out. The case will absorb the heat and the shaft will heat faster. If your careful you can blow out the shaft with no damage to the case. I've done this on various things in the past with good success
Please Log in or Create an account to join the conversation.
6 years 7 months ago #178377
by neil
Cheers,
Neil
Pittsford, NY
Replied by neil on topic D2-5U13753 - master pins - please check my understanding
Pretty comfortable Gary and I did consider it - the long piece is 4.5" long so I'll get it to the 1/2 dia. which is all my drill will take and then heat it, cool it to hopefully shrink some, then also hit it with some freeze spray and see what happens. I'm definitely going to go straight to cutting the short piece out as I know it will easily blow through. I'll be interested to see if I can detect any "glue" inside it. I'll have my guy make up a new shaft a thou or so smaller dia. Nominally 3/4 but I suspect shrunk a bit now as it's been got at before.
Cheers,
Neil
Pittsford, NY
Please Log in or Create an account to join the conversation.
6 years 7 months ago #178379
by ccjersey
D2-5J's, D6-9U's, D318 and D333 power units, 12E-99E grader, 922B & 944A wheel loaders, D330C generator set, DW20 water tanker and a bunch of Jersey cows to take care of in my spare time:D
Replied by ccjersey on topic D2-5U13753 - master pins - please check my understanding
0Neil,
I am not familiar with the shaft/pin you are working on, but if its in a blind hole, you might be able to use hydraulic force to extract it once you get a hole all the way through.
Heavy grease, bread, wet paper towels etc is packed in and then a driver that fits the hole tight is started on top of the packing and hit with a hammer. There are some Youtube videos circulating lately that show people doing it.
Alternatively you might tap it and install a grease fitting and pressurize it that way.
D2-5J's, D6-9U's, D318 and D333 power units, 12E-99E grader, 922B & 944A wheel loaders, D330C generator set, DW20 water tanker and a bunch of Jersey cows to take care of in my spare time:D
Please Log in or Create an account to join the conversation.
6 years 7 months ago #178384
by STEPHEN
I think I have a few spare links, well used. If you can use them let me know
Replied by STEPHEN on topic D2-5U13753 - master pins - please check my understanding
Also enquired about some new rail links, bushings, etc. to extend the new 30-link chains to 32 links and then put them on the 5U instead of the 3J. Idea is that I won't have to grind anything down if it's all new. Of course, none of these parts are available new from Cat so it's off to Dana I go...
I think I have a few spare links, well used. If you can use them let me know
Please Log in or Create an account to join the conversation.
- Forum
- Antique Caterpillar Machinery Owners Club
- DISCUSSION
- D2-5U13753 - master pins - please check my understanding
Time to create page: 0.419 seconds
ACMOC
Antique Caterpillar Machinery Owners Club
P.O. Box 9301
Peoria, IL 61612
(309) 691-5002
cat@acmoc.org
Become a Member!
"I became a member recently because the wealth of knowledge here is priceless."
- Chris R
"I also joined a year ago. had been on here a couple of times as a non-member and found the info very helpful so I got a one year subscription (not very expensive at all) to try it out. I really like all the resources on here so I just got a three year. I think its a very small price for what you can get out of this site."
- Jason N