- Posts: 469
- Thank you received: 63

ACMOC Membership Benefits
- FREE quarterly magazine filled with content about antique Caterpillar machines
- FREE classified listings
- ACMOC store discounts and specials
- Full Bulletin Board Access
- Marketplace (For Sale/Wanted)
- Technical Library
- Post attachments
$44 /year ELECTRONIC
$60 /year USA
$77 /year International
D7 17A With “Stuck” Engine
3 years 3 weeks ago #230975
by PhilC
944A - Machine SN 43A2589 Engine SN 90A284
955K- Machine SN 71J3772 Engine SN 83Z0704
D6 SN's 4R732sp, 5R2724, 5R4832
D8 SN's 15A1254, 15A2287, 15A2723
Replied by PhilC on topic D7 17A With “Stuck” Engine
If there is coolant leaking from the cover when you loosen it up then it is an access cover for the water jacket around the cylinders and will not show you anything useful.
I agree with Neil. Water has gotten in through the crack in the manifold and one or more cylinders have water in them. I say one or more because if there has been enough water get in it will fill one up and then move onto another. Leakage past the rings may not be enough to keep the water contained in one cylinder.
If that was my machine first I would drain the engine oil looking for water and then I would be looking at draining the coolant, removing the injectors, removing the pre-combustion chambers and putting a bore-scope down the hole to identify which cylinder/s has water damage or go straight in and pull the heads off.
If you do pull the heads off and you attempt to force the piston to move by rotating the crankshaft be aware that this can cause a liner to move up out of its seat.
Another question is how did all that leaf matter get into the exhaust manifold? Does this machine have a rain cap/trap or something on the exhaust pipe?
944A - Machine SN 43A2589 Engine SN 90A284
955K- Machine SN 71J3772 Engine SN 83Z0704
D6 SN's 4R732sp, 5R2724, 5R4832
D8 SN's 15A1254, 15A2287, 15A2723
The following user(s) said Thank You: RootRakeKid
Please Log in or Create an account to join the conversation.
- RootRakeKid
-
 Topic Author
- Offline
- New Boarder
- User
Less
More
- Posts: 17
- Thank you received: 2
3 years 3 weeks ago #230982
by RootRakeKid
Replied by RootRakeKid on topic D7 17A With “Stuck” Engine
I’m still unclear about where the pre-combustion chamber is. It seems that it’s part of the head and not something you can remove separate from the head? I’ve posted a photo of one of the injectors. As I’ve indicated in an earlier post i have removed all of the injectors. To inspect the cylinder a borescope would then be inserted in the opening in the head where the injectors were removed. Is that right?
There was a rain cap. My dozer is in a remote wooded location. Mice are very opportunistic and will nest anywhere.
I’ve also posted photos of the heads with the valve covers removed. The relative heights of the valves in one of the heads seems a little suspicious? Can the valves be manually opened and closed (to see if there stuck) by disconnecting them from the push rods and then using a tool to open and close them?
Lastly - where is the radiator drain plug! I wasn’t able to find it.
Please Log in or Create an account to join the conversation.
- RootRakeKid
-
Topic Author
- Offline
- New Boarder
- User
Less
More
- Posts: 17
- Thank you received: 2
3 years 3 weeks ago #230983
by RootRakeKid
Replied by RootRakeKid on topic D7 17A With “Stuck” Engine
Here are the photos I meant to attach.
Please Log in or Create an account to join the conversation.
3 years 3 weeks ago - 3 years 3 weeks ago #230985
by Rome K/G
Replied by Rome K/G on topic D7 17A With “Stuck” Engine
Water can also enter through the tappet cover washers under the nuts if the seals get hard or cracked or the nuts are not snug. The precombustion chambers are the large housings in the head where the nozzles set in.
Last edit: 3 years 3 weeks ago by Rome K/G.
The following user(s) said Thank You: RootRakeKid
Please Log in or Create an account to join the conversation.
3 years 3 weeks ago #230986
by edb
Replied by edb on topic D7 17A With “Stuck” Engine
Hi RRK,
the valves are unequal height because the engine camshaft lobes have opened them to enable the four stroke cycle to complete.
You should be able to push down on the rocker arm ends and open them further or you can gently lever up on the push rod end of the arms.
If the de-compression lever has been activated then the inlet valves will be held off their seats too--any valves so opened may stay open when the de-compression is deactivated due to being stuck with crud in their stem/guides or the mouse leavings may be trapped between the valve head and seat.
The pre-chambers are the item where you removed the injectors from as is shown in the scan below--also shown is the later type pre-chamber (item 4) without out the separate cap--fully machined one piece unit.
You will need the tools shown in one of the scans to remove them. I recently did a D311 reseal of the upper cap and purchased the bolt and nu from the Dealer I has a piece of all thread for the refitting of said cap--you should be able to purchase the splined tool for from the Dealer or else where on line--someone had put up this info in the last week or so.
The radiator drain is accessible thru a hole for such in the left side of the radiator cone/chassis and should go into the elbow on the bottom of the water pump--it is stainless steel and it seats on its end and from memory needs to unscrew about 4 turns to begin to drain it can screw all the way out if you desire to clean any crud at the seat on an old system full of rust flakes etc.
I seem to recall there was a short tube supplied in the tool kit of later machines that screws into the drain port to save filling the belly pan full of coolant--cannot recall the thread size but likely around 3/8" or 1/2" NPT.
Cheers,
Eddie B.
The following user(s) said Thank You: trainzkid88, RootRakeKid
Please Log in or Create an account to join the conversation.
- trainzkid88
-
- Offline
- Platinum Boarder
- Member
Less
More
- Posts: 1017
- Thank you received: 387
3 years 3 weeks ago #230993
by trainzkid88
Replied by trainzkid88 on topic D7 17A With “Stuck” Engine
moisture defiantly has got past the rocker cover seals as the holding studs are rusty. in the one photo it shows 2 of thee valves are open. you can gently give them a tap with a brass drift and a soft face hammer they should feel springy actually that is part of doing a valve job on most engines is to tap the valves with a soft face hammer to make sure the retainers and springs are properly seated before you install the head or so a retired engine builder taught me.
one thing to remember with rain caps and exhaust flaps too is that they are weighted and fit neat enough that the vermin cant get past them mice only need a 1/4 inch gap to squeeze through.
one thing to remember with rain caps and exhaust flaps too is that they are weighted and fit neat enough that the vermin cant get past them mice only need a 1/4 inch gap to squeeze through.
The following user(s) said Thank You: edb, RootRakeKid
Please Log in or Create an account to join the conversation.
- RootRakeKid
-
Topic Author
- Offline
- New Boarder
- User
Less
More
- Posts: 17
- Thank you received: 2
3 years 6 days ago #231410
by RootRakeKid
Replied by RootRakeKid on topic D7 17A With “Stuck” Engine
I’m currently looking for a service manual for my 17A. I found one on eBay for a 1960 17A non-turbo. My dozer is a 1956 non-turbo. Are the engines pretty much the same and will the 1960 service manual be suitable?
Update: recently drained the oil and looked for obvious signs of water but didn’t notice any. Would that have been obvious if water was present? Currently working on removing the belly pan. I’m not sure if the belly pan can be removed from the front because of the blade being in the way. I might have to drag it out the rear.
Question: what is the dimension of the opening between the exhaust valve and the engine block when fully opened?
Please Log in or Create an account to join the conversation.
- trainzkid88
-
- Offline
- Platinum Boarder
- Member
Less
More
- Posts: 1017
- Thank you received: 387
3 years 4 days ago #231439
by trainzkid88
Replied by trainzkid88 on topic D7 17A With “Stuck” Engine
the manual probably will be fine. they cover form x serial number onwards so if that is lower than yours its the correct book. but the differences are usually minor but the procedures are pretty much the same. it will at least give you a good foundation of knowledge to work from.
to find water in oil let some sit in a clear container and settle for a couple of days the water should settle to the bottom as oil floats on water.
also did the oil look milky or any colour other than black. or the colour of new oil.
you mean the valve lift. well if the valve spring is fully compressed then the valve has full travel note they can open more than what the valve lift actually is. the info will be in the manual for the engine. yes cat had separate manuals for the engines as many were also used as stationary engines.
most belly plates are removed by unbolting them, lowering to the ground and then drive the machine forwards as that is the easy way to do it. so yes drag it out from the rear.
The following user(s) said Thank You: RootRakeKid
Please Log in or Create an account to join the conversation.
- RootRakeKid
-
Topic Author
- Offline
- New Boarder
- User
Less
More
- Posts: 17
- Thank you received: 2
3 years 4 days ago #231451
by RootRakeKid
Replied by RootRakeKid on topic D7 17A With “Stuck” Engine
The oil was black.
I asked about the valve opening because I have this theory that rodents actually got in to the cylinder bore and may have created a nest there. When I first tried turning the motor over I “thought” I heard it start to turn over but then abruptly stopped. That may be indicative of some kind of blockage. If the exhaust valve opening is a 1/4” +/-, then mice could certainly have gotten into the bore. However everyone I talk to says that’s unlikely and that water is the culprit.
At the moment I am still thinking I can unstuck the motor without having to remove the heads. The last YouTube video I watched was of a CAT dozer with seized pistons that hadn’t been started in 30 years. They used another dozer to push the one with the seized pistons until it was freed up and it actually started! And that’s not the only video I’ve seen that uses this technique to free up a “stuck” motor.
This is what I think I’m going to do next: I’m going to hire someone with a good size dozer to push my D7 to see if it could be freed up that way. But before that I might get the tool that’s required to remove the pre-combustion chamber and then use a bore scope to look for any blockage. I’ve had oil sitting in the cylinders for a number of weeks now. So I’m thinking cylinder wall scoring will be kept to a minimum if the pistons break free.
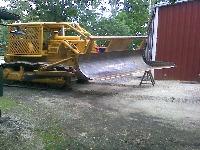
One question I have is how I could keep the blade raised so that it can be pushed forward and backward without the blade dragging. I thought I could Jack the blade up and temporarily weld a piece of steel from the frame to the dozer blade arm. I’m not sure of the correct terminology but I’ve attached a pic of where the steel would go.
One last thing: I saw this great video on removing the heads on an old D8. It gave me a birds eye view of what would be involved in removing the D7 17A heads.
I asked about the valve opening because I have this theory that rodents actually got in to the cylinder bore and may have created a nest there. When I first tried turning the motor over I “thought” I heard it start to turn over but then abruptly stopped. That may be indicative of some kind of blockage. If the exhaust valve opening is a 1/4” +/-, then mice could certainly have gotten into the bore. However everyone I talk to says that’s unlikely and that water is the culprit.
At the moment I am still thinking I can unstuck the motor without having to remove the heads. The last YouTube video I watched was of a CAT dozer with seized pistons that hadn’t been started in 30 years. They used another dozer to push the one with the seized pistons until it was freed up and it actually started! And that’s not the only video I’ve seen that uses this technique to free up a “stuck” motor.
This is what I think I’m going to do next: I’m going to hire someone with a good size dozer to push my D7 to see if it could be freed up that way. But before that I might get the tool that’s required to remove the pre-combustion chamber and then use a bore scope to look for any blockage. I’ve had oil sitting in the cylinders for a number of weeks now. So I’m thinking cylinder wall scoring will be kept to a minimum if the pistons break free.
One question I have is how I could keep the blade raised so that it can be pushed forward and backward without the blade dragging. I thought I could Jack the blade up and temporarily weld a piece of steel from the frame to the dozer blade arm. I’m not sure of the correct terminology but I’ve attached a pic of where the steel would go.
One last thing: I saw this great video on removing the heads on an old D8. It gave me a birds eye view of what would be involved in removing the D7 17A heads.
Please Log in or Create an account to join the conversation.
- trainzkid88
-
- Offline
- Platinum Boarder
- Member
Less
More
- Posts: 1017
- Thank you received: 387
3 years 4 days ago #231466
by trainzkid88
Replied by trainzkid88 on topic D7 17A With “Stuck” Engine
no! that can break things.
pour diesel down each valve port use a catheter syringe small funnel with a bit of thin tube whatever you need to get it in there and let it soak. the easiest is to pull the heads and then you can see whats what. a rust line can be tough enough to break rings or even a ring land which means new pistons which gets expensive fast.
do things the gentle way and break nothing yes i know it takes time but it can save lots of money because you can recondition most of the parts and put them back in service you only replace bearings seals/gaskets and rings.
Please Log in or Create an account to join the conversation.
Time to create page: 0.224 seconds
ACMOC
Antique Caterpillar Machinery Owners Club
P.O. Box 9301
Peoria, IL 61612
(309) 691-5002
cat@acmoc.org
Become a Member!
"I became a member recently because the wealth of knowledge here is priceless."
- Chris R
"I also joined a year ago. had been on here a couple of times as a non-member and found the info very helpful so I got a one year subscription (not very expensive at all) to try it out. I really like all the resources on here so I just got a three year. I think its a very small price for what you can get out of this site."
- Jason N