- Posts: 102
- Thank you received: 2

ACMOC Membership Benefits
- FREE quarterly magazine filled with content about antique Caterpillar machines
- FREE classified listings
- ACMOC store discounts and specials
- Full Bulletin Board Access
- Marketplace (For Sale/Wanted)
- Technical Library
- Post attachments
$44 /year ELECTRONIC
$60 /year USA
$77 /year International
- Forum
- Antique Caterpillar Machinery Owners Club
- DISCUSSION
- 933 starter upgrade d311 engine factory inertia starter
933 starter upgrade d311 engine factory inertia starter
4 years 5 months ago #216189
by rehpig
933 starter upgrade d311 engine factory inertia starter was created by rehpig
Just for clarification, I have a 933 Traxcavator SN 11A0821 D2 Frame with five bottom track rollers, that was equipped from the factory with Electric Start it also has a WET Clutch. This was not a conversion done at a later date (as far as I know.....No pony motor or any indication on the firewall of having a pony motor installed) I have been working on this for some time and have posted on another thread about my Head gasket replacement. Thought it was time to put down some specifics about what I did.
Many thanks to ACMOC, Old Magnet and his exhaustive research and knowledge and restore49 for walking me though many of the steps and encouraging me to go the route of 42 MT STARTER.
The beginning: Original inertia drive starter was rebuilt last summer and has been slowly failing since. I believe now that I didn't get such a good job done. For one, the "expert" said that no parts were available. I have found a supplier that had all the parts available. Some how I was able to locate all......Hummmmmm.
Cost to rebuild for parts was approx. $440.00. I do have the part numbers for the Armature, Field, Brushes for the original factory starter if anyone wants them. Inertia Bendix parts were not found although I stopped my search after getting the parts price.
Decision to upgrade into a 42mt starter: I found that four (4) parts need to be obtained. Starter motor.....42mt. I believe they are all similar in their Motor and you will need to remove and replace the Drive End Housing so just finding a good deal on a rebuild 42mt is my suggestion. I purchased this starter (42MT P/N 8200957 from J&N Phone number 800 366 7100) new price was about $270.00.
You will also need this Drive End Housing. Part number 371-12129. This housing was a direct proper fit to my existing DEH without any modification for it to fit the three (3) existing 1/2" mounting studs. NOTE: You do have to modify the DE housing or the Bell Housing and I will detail that a little later in this post. Gasket for drive end to bell housing: PN 180-12141 (sold two(2) per package)
You will also need to purchase a 102751PG
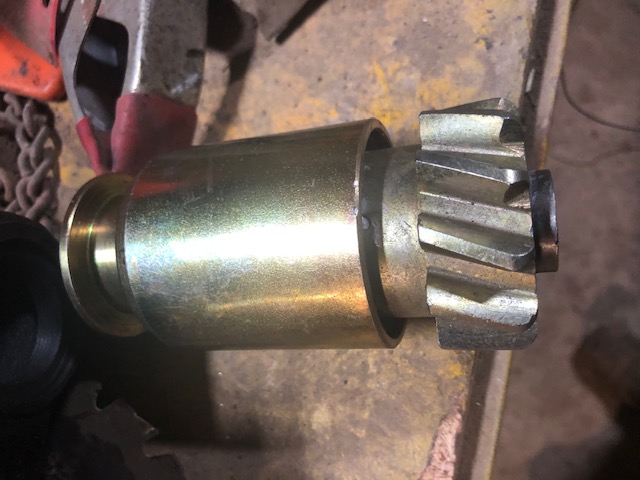 which is the Bendix for the starter with the 11 tooth helix gear. I purchased this from VanBergen and Greener in Illinois 800-621-3889. Cost was about $30.00 Just for record/knowledge here is a picture of the original bendix gear
There was a learning curve for me on this installation and required me to install and remove the starter more times than I care to say, luckily I do have an A-Frame with a chain fall and the task really only took about 20 minutes total (once I did it a few times). Remember that this is a Loader and the loader frame is perfectly placed in the way.
Assembly: Once all the parts arrived, this is what needs to be done.
1. Remove the drive end housing from your starter.
2. Remove the Solenoid and housing from the starter. I removed them as a system by just removing the bolt that ties the solenoid to the motor electrically and the bolts on the end of the housing/motor connection. This needs to be done to remove and install the new Bendix. This is a simple task, the Bendix simply slides on to the armature shaft. Note: Do not pull out the armature as it will require you to reinstall the brushes. After the Bendix is installed you can reinstall the solenoid housing and reinstall the electrical bolt.
3. Next step would be to install the DE Housing onto the starter motor/solenoid. This step is where some of the extra work needs to be done.
a. I have found through many of the installations/reinstallations that the DE Housing is not suited without modification for the wet clutch or the fact that the NEW drive gear is larger than the original drive gear on the inertia or the clearance of the nose to the flywheel ring gear.
First modification that I did was to remove 1/16" from the drive end housing on the outboard side to allow for the starter to move to the furthermost outboard location without enlarging the original 5/8" mounting holes that are part of the unmodified DE Housing
 . As a side note, my first installation did not do this modification and it caused the gear to engage but the gear was stuck in place. I did try this with the engine in Decompression for there was no worry of it starting and destroying my new starter. Once completed, it worked perfectly.
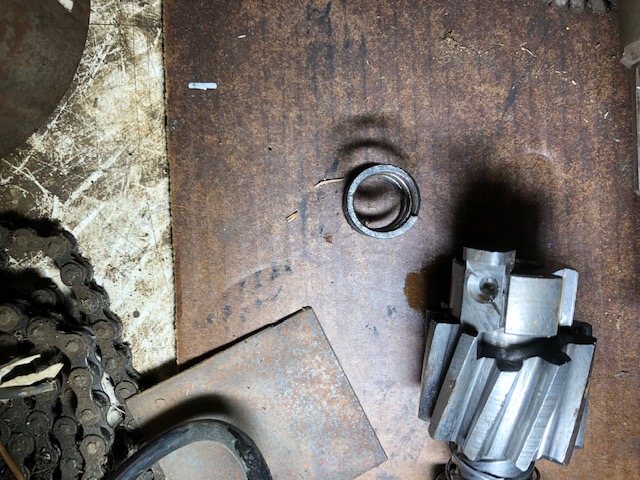
Second modification was to deal with the wet clutch problem. The DE Housing is not suited with an o-ring to seal the connection between the solenoid housing and the DE Housing. This required making a gasket to fit this connection as well as welding up the extra holes in the DE Housing
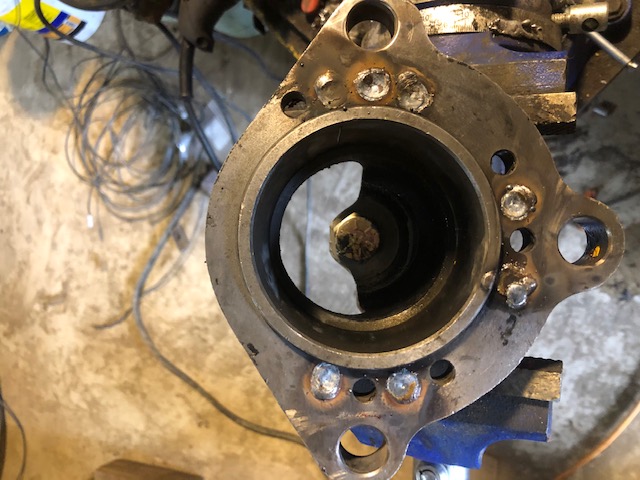 that are there for the sole purpose of clocking the solenoid to clear the engine block, loader frame, bell housing , etc. anything that is in the way. You will see by my photographs the initial welding and the subsequent sanding/grinding to bring the machine surface back to flat
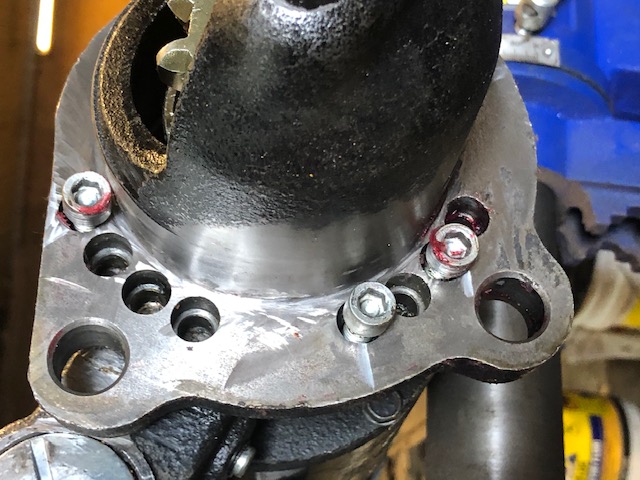
 . You will also see that for my installation it required the clocking of the solenoid to be inline with the top mounting stud
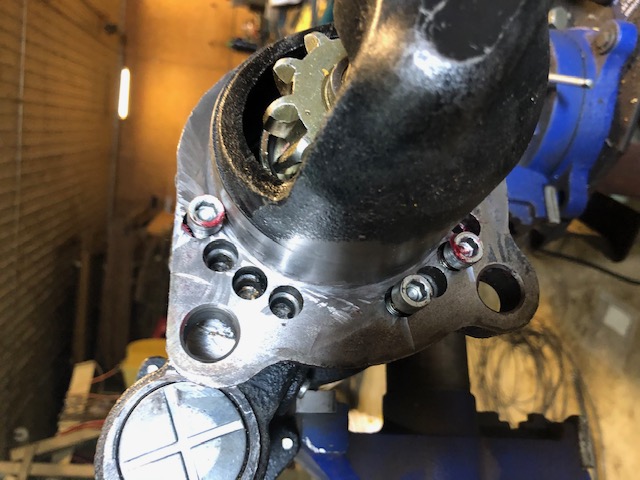 . This made the solenoid clear the bell housing protrusion from the pony motor provision, and the loader frame. This created a small problem of installation of the nut on the stud. To solve this problem I determined what length the stud needed to be cut to so as not run into the solenoid housing once the starter was tightened up against the bell housing. Also a small amount of grinding on the solenoid housing and the nut corners. Special open end wrench was made out of an old router collet tool to fit the width and the small space for the length of the wrench. Note the notch in the end of the tool to accommodate the use of a chisel and hammer to tighten the nut.
Third modification: is the DE HOUSING opening needed modification via grinding the lower opening to clear the flywheel gears. This was minor and easily checked by just installing the DE Housing separately into the bell housing to verify clearance.
The sealer that I ultimately used was an aircraft fuel tank sealer, (my brother is an aircraft mechanic and turned me on to this product: Aircraft Spruce: AC TECH AC-350 B-1/2 3.5 OZ KIT AMS-S-8802
Part #: 09-05593
This is a two part type sealer with about 1/2 hour working time. Other time frames are options. This worked for me but it was 50 degrees in my shop. Any hotter and it would have been a trainwreck!!!
I applied this sealer to the solenoid housing/DE Housing connection and filled all unused mounting holes, installed the DE Housing to the solenoid housing and then proceeded to apply the sealer to the DE Housing/Bell Housing connection and gasket. Use gloves as this stuff does not want to come off with any known solvent. Only time and layers of skin. I then lowered the starter into the final location with the chain fall and installed the two lower mounting nut (partially as the upper nut needs to be started prior to the starter being pushed up against the bell housing. A long nose needle nose pliers was very useful. Making sure that the nut moved effortlessly on the threads was critical to ease the installation of this nut. Once this nut was snugged up I proceeded to tighten the two lower nuts and then back up top to do final tighten on the top nut. In the process of tightening the lower nuts I used a pry bar to move the starter to the outboard most location. Installation of the starter completed with the connection of the wire from the start switch to the solenoid and the battery cables to the main starter studs. This sealer is tough stuff and I would recommend that you install the starter and test that it is all aligned and working properly before you do the final installation with this sealer. I went this way with the sealer as I had already purchased this for a previous project and did not use it. Other sealers/gasket makers may just do fine but this is what I used. Hope I never have to remove this starter again!!!! I will edit tomorrow with the installation of photographs outlining a few of the steps that I think will help you all understand each step I took. Hope this helps someone in their project.
Many thanks to ACMOC, Old Magnet and his exhaustive research and knowledge and restore49 for walking me though many of the steps and encouraging me to go the route of 42 MT STARTER.
The beginning: Original inertia drive starter was rebuilt last summer and has been slowly failing since. I believe now that I didn't get such a good job done. For one, the "expert" said that no parts were available. I have found a supplier that had all the parts available. Some how I was able to locate all......Hummmmmm.
Cost to rebuild for parts was approx. $440.00. I do have the part numbers for the Armature, Field, Brushes for the original factory starter if anyone wants them. Inertia Bendix parts were not found although I stopped my search after getting the parts price.
Decision to upgrade into a 42mt starter: I found that four (4) parts need to be obtained. Starter motor.....42mt. I believe they are all similar in their Motor and you will need to remove and replace the Drive End Housing so just finding a good deal on a rebuild 42mt is my suggestion. I purchased this starter (42MT P/N 8200957 from J&N Phone number 800 366 7100) new price was about $270.00.
You will also need this Drive End Housing. Part number 371-12129. This housing was a direct proper fit to my existing DEH without any modification for it to fit the three (3) existing 1/2" mounting studs. NOTE: You do have to modify the DE housing or the Bell Housing and I will detail that a little later in this post. Gasket for drive end to bell housing: PN 180-12141 (sold two(2) per package)
You will also need to purchase a 102751PG
There was a learning curve for me on this installation and required me to install and remove the starter more times than I care to say, luckily I do have an A-Frame with a chain fall and the task really only took about 20 minutes total (once I did it a few times). Remember that this is a Loader and the loader frame is perfectly placed in the way.
Assembly: Once all the parts arrived, this is what needs to be done.
1. Remove the drive end housing from your starter.
2. Remove the Solenoid and housing from the starter. I removed them as a system by just removing the bolt that ties the solenoid to the motor electrically and the bolts on the end of the housing/motor connection. This needs to be done to remove and install the new Bendix. This is a simple task, the Bendix simply slides on to the armature shaft. Note: Do not pull out the armature as it will require you to reinstall the brushes. After the Bendix is installed you can reinstall the solenoid housing and reinstall the electrical bolt.
3. Next step would be to install the DE Housing onto the starter motor/solenoid. This step is where some of the extra work needs to be done.
a. I have found through many of the installations/reinstallations that the DE Housing is not suited without modification for the wet clutch or the fact that the NEW drive gear is larger than the original drive gear on the inertia or the clearance of the nose to the flywheel ring gear.
First modification that I did was to remove 1/16" from the drive end housing on the outboard side to allow for the starter to move to the furthermost outboard location without enlarging the original 5/8" mounting holes that are part of the unmodified DE Housing
Second modification was to deal with the wet clutch problem. The DE Housing is not suited with an o-ring to seal the connection between the solenoid housing and the DE Housing. This required making a gasket to fit this connection as well as welding up the extra holes in the DE Housing
Third modification: is the DE HOUSING opening needed modification via grinding the lower opening to clear the flywheel gears. This was minor and easily checked by just installing the DE Housing separately into the bell housing to verify clearance.
The sealer that I ultimately used was an aircraft fuel tank sealer, (my brother is an aircraft mechanic and turned me on to this product: Aircraft Spruce: AC TECH AC-350 B-1/2 3.5 OZ KIT AMS-S-8802
Part #: 09-05593
This is a two part type sealer with about 1/2 hour working time. Other time frames are options. This worked for me but it was 50 degrees in my shop. Any hotter and it would have been a trainwreck!!!
I applied this sealer to the solenoid housing/DE Housing connection and filled all unused mounting holes, installed the DE Housing to the solenoid housing and then proceeded to apply the sealer to the DE Housing/Bell Housing connection and gasket. Use gloves as this stuff does not want to come off with any known solvent. Only time and layers of skin. I then lowered the starter into the final location with the chain fall and installed the two lower mounting nut (partially as the upper nut needs to be started prior to the starter being pushed up against the bell housing. A long nose needle nose pliers was very useful. Making sure that the nut moved effortlessly on the threads was critical to ease the installation of this nut. Once this nut was snugged up I proceeded to tighten the two lower nuts and then back up top to do final tighten on the top nut. In the process of tightening the lower nuts I used a pry bar to move the starter to the outboard most location. Installation of the starter completed with the connection of the wire from the start switch to the solenoid and the battery cables to the main starter studs. This sealer is tough stuff and I would recommend that you install the starter and test that it is all aligned and working properly before you do the final installation with this sealer. I went this way with the sealer as I had already purchased this for a previous project and did not use it. Other sealers/gasket makers may just do fine but this is what I used. Hope I never have to remove this starter again!!!! I will edit tomorrow with the installation of photographs outlining a few of the steps that I think will help you all understand each step I took. Hope this helps someone in their project.
Please Log in or Create an account to join the conversation.
4 years 5 months ago #216190
by neil
Cheers,
Neil
Pittsford, NY
Replied by neil on topic 933 starter upgrade d311 engine factory inertia starter
Nice write-up, thanks for that. There are neoprene pucks that you can use to seal the clocking holes rather than welding, but either method works.
Cheers,
Neil
Pittsford, NY
Please Log in or Create an account to join the conversation.
4 years 5 months ago #216209
by Ray54
Replied by Ray54 on topic 933 starter upgrade d311 engine factory inertia starter
Another thank you for such complete description of how to update to a latter style starter. One of the kind of things that need to end up in the how to section.
Please Log in or Create an account to join the conversation.
- Old Magnet
-

- Offline
- Platinum Boarder
- Member
Less
More
- Posts: 16175
- Thank you received: 504
4 years 5 months ago #216210
by Old Magnet
Replied by Old Magnet on topic 933 starter upgrade d311 engine factory inertia starter
Use a 42MT starter that comes with a Delco 10476030 lever housing (12 index holes) and a 10476100 drive end housing that has the o-ring seal. This will allow you to pick up all six of the DEH indexing screws.
No need to weld up extra holes, there are rubber balls used to seal extra holes.
Do nut use DEH to flywheel housing gasket unless housing flange is faced. Gasket just takes away drive engagement depth.
If you must use a sealer, use this stuff...
No need to weld up extra holes, there are rubber balls used to seal extra holes.
Do nut use DEH to flywheel housing gasket unless housing flange is faced. Gasket just takes away drive engagement depth.
If you must use a sealer, use this stuff...
Please Log in or Create an account to join the conversation.
4 years 5 months ago #216219
by rehpig
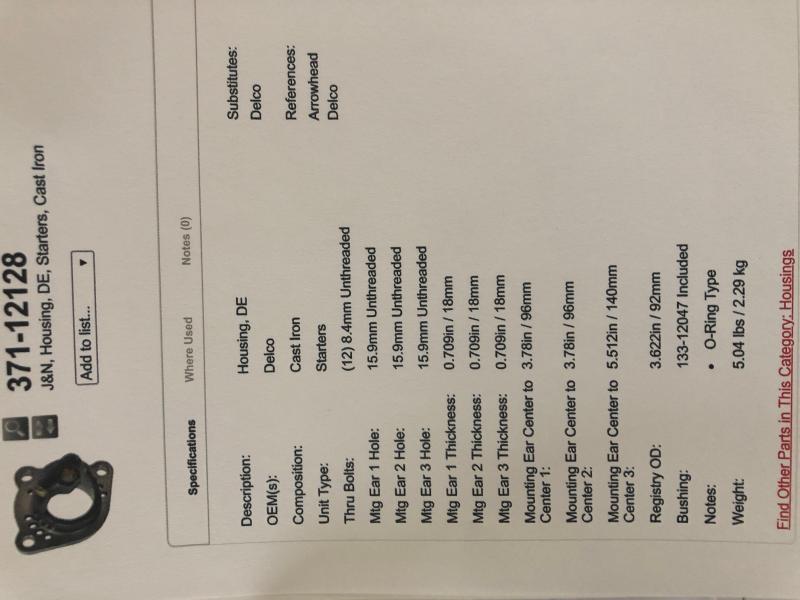
Here is the spec sheet for 371-12128 which is the J&N number for the Delco 10476100. I have not personally had one of these in my hand but my original DEH has a 150mm dimension from centerline holes that run thru the shaft of the armature. This spec sheet shows a 140mm dimension and that led me to order the 371-12129 housing which has the exact centerline dimension as my original inertial starter housing. Maybe I have a basterd machine....that I don't know but the 10476100 would not fit UNLESS this spec sheet is Wrong. I would love to know, measuring from the exact part what that dimension actually is. If someone has that part on hand would you please measure it?
Thanks for the information on the sealant. Won't help me but the next guy it surely will.
Thank you for the information of the solenoid housing. That picture looks exactly like mine. The clocking that worked best for me put that hole that has the bolt in it right in line with one of the 6 bolts. Maybe that bolt can come out???? I did not try that. But if it is removable and replaceable by one of the 6 bolts.....that would have been better.
I initially tried to use the 5/8" -1/2" bushings in the 5/8" mounting holes but they had to come out so that I could move the starter 1/16" outboard. Again, I was using preexisting studs from the factory (as best I know)
EDIT: Does anyone know why all my pictures rotate 90 degrees when I post?
Replied by rehpig on topic 933 starter upgrade d311 engine factory inertia starter
Use a 42MT starter that comes with a Delco 10476030 lever housing (12 index holes) and a 10476100 drive end housing that has the o-ring seal. This will allow you to pick up all six of the DEH indexing screws.
No need to weld up extra holes, there are rubber balls used to seal extra holes.
Do nut use DEH to flywheel housing gasket unless housing flange is faced. Gasket just takes away drive engagement depth.
If you must use a sealer, use this stuff...
Here is the spec sheet for 371-12128 which is the J&N number for the Delco 10476100. I have not personally had one of these in my hand but my original DEH has a 150mm dimension from centerline holes that run thru the shaft of the armature. This spec sheet shows a 140mm dimension and that led me to order the 371-12129 housing which has the exact centerline dimension as my original inertial starter housing. Maybe I have a basterd machine....that I don't know but the 10476100 would not fit UNLESS this spec sheet is Wrong. I would love to know, measuring from the exact part what that dimension actually is. If someone has that part on hand would you please measure it?
Thanks for the information on the sealant. Won't help me but the next guy it surely will.
Thank you for the information of the solenoid housing. That picture looks exactly like mine. The clocking that worked best for me put that hole that has the bolt in it right in line with one of the 6 bolts. Maybe that bolt can come out???? I did not try that. But if it is removable and replaceable by one of the 6 bolts.....that would have been better.
I initially tried to use the 5/8" -1/2" bushings in the 5/8" mounting holes but they had to come out so that I could move the starter 1/16" outboard. Again, I was using preexisting studs from the factory (as best I know)
EDIT: Does anyone know why all my pictures rotate 90 degrees when I post?
Please Log in or Create an account to join the conversation.
- Old Magnet
-
- Offline
- Platinum Boarder
- Member
Less
More
- Posts: 16175
- Thank you received: 504
4 years 5 months ago #216224
by Old Magnet
Replied by Old Magnet on topic 933 starter upgrade d311 engine factory inertia starter
If the 150mm long side bolt pattern works good for the original 933/D2 direct electric start using the old 40/50MT gasket face drive end housing then that's the way to go. For new conversions go with the 10476100 DEH with o-ring seal that matches the 42MT starter.
Please Log in or Create an account to join the conversation.
4 years 5 months ago #216227
by neil
Cheers,
Neil
Pittsford, NY
Replied by neil on topic 933 starter upgrade d311 engine factory inertia starter
Your pictures rotate because you either have an Apple phone or do not have an Apple phone : ) Pictures contain a section that describes orientation (e.g. landscape or portrait) but not all platforms examine that information and apply the "correction" to rotate the picture so that it views the same way that you took the picture. (there may be other phones that behave the same way but Apple was one that paid attention to that orientation information)
Cheers,
Neil
Pittsford, NY
Please Log in or Create an account to join the conversation.
- Forum
- Antique Caterpillar Machinery Owners Club
- DISCUSSION
- 933 starter upgrade d311 engine factory inertia starter
Time to create page: 0.193 seconds
ACMOC
Antique Caterpillar Machinery Owners Club
P.O. Box 9301
Peoria, IL 61612
(309) 691-5002
cat@acmoc.org
Become a Member!
"I became a member recently because the wealth of knowledge here is priceless."
- Chris R
"I also joined a year ago. had been on here a couple of times as a non-member and found the info very helpful so I got a one year subscription (not very expensive at all) to try it out. I really like all the resources on here so I just got a three year. I think its a very small price for what you can get out of this site."
- Jason N