- Posts: 17
- Thank you received: 3

ACMOC Membership Benefits
- FREE quarterly magazine filled with content about antique Caterpillar machines
- FREE classified listings
- ACMOC store discounts and specials
- Full Bulletin Board Access
- Marketplace (For Sale/Wanted)
- Technical Library
- Post attachments
$44 /year ELECTRONIC
$60 /year USA
$77 /year International
1965 D6B Restoration Project
- marbleknight
-
 Topic Author
- Offline
- New Boarder
- User
Less
More
3 years 10 months ago #223485
by marbleknight
1965 D6B Restoration Project was created by marbleknight
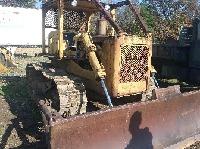
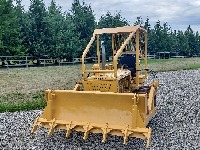
Bringing back on old D6B. I'll post pics showing the different stages of repair and restoration. This machine was bought to be a workhorse, not a showroom piece by any means so the restoration will be very functional. This machine was made to work, and I think it will be happier doing that with a good service, paint, and replacement of broken / worn parts.
When I got the dozer I was able to drive it to the place where it sits now, but barely. The brake pedals probably travel a foot or so before the dozer starts to turn, I see leaks of both oil and fuel coming from somewhere, and the blade lift cylinders literally pour oil. The wiring looks like a rat's nest, and there is reason to believe there has been a fire in the vicinity of the service hour meter on the fuel pump housing. The belly pan is so full of junk you can see it sneaking out between some of the body panels higher up. Besides that it hadn't seen a good paint job in probably 20-30 years.
To bring her back, I plan the following activities which I'll share pictures of as I go:
- Begin restoring paint, section by section
- Drain all lubricants, flush and replace. Crankcase, hydraulic, final drives, steering clutch, etc.
- Replace all filters
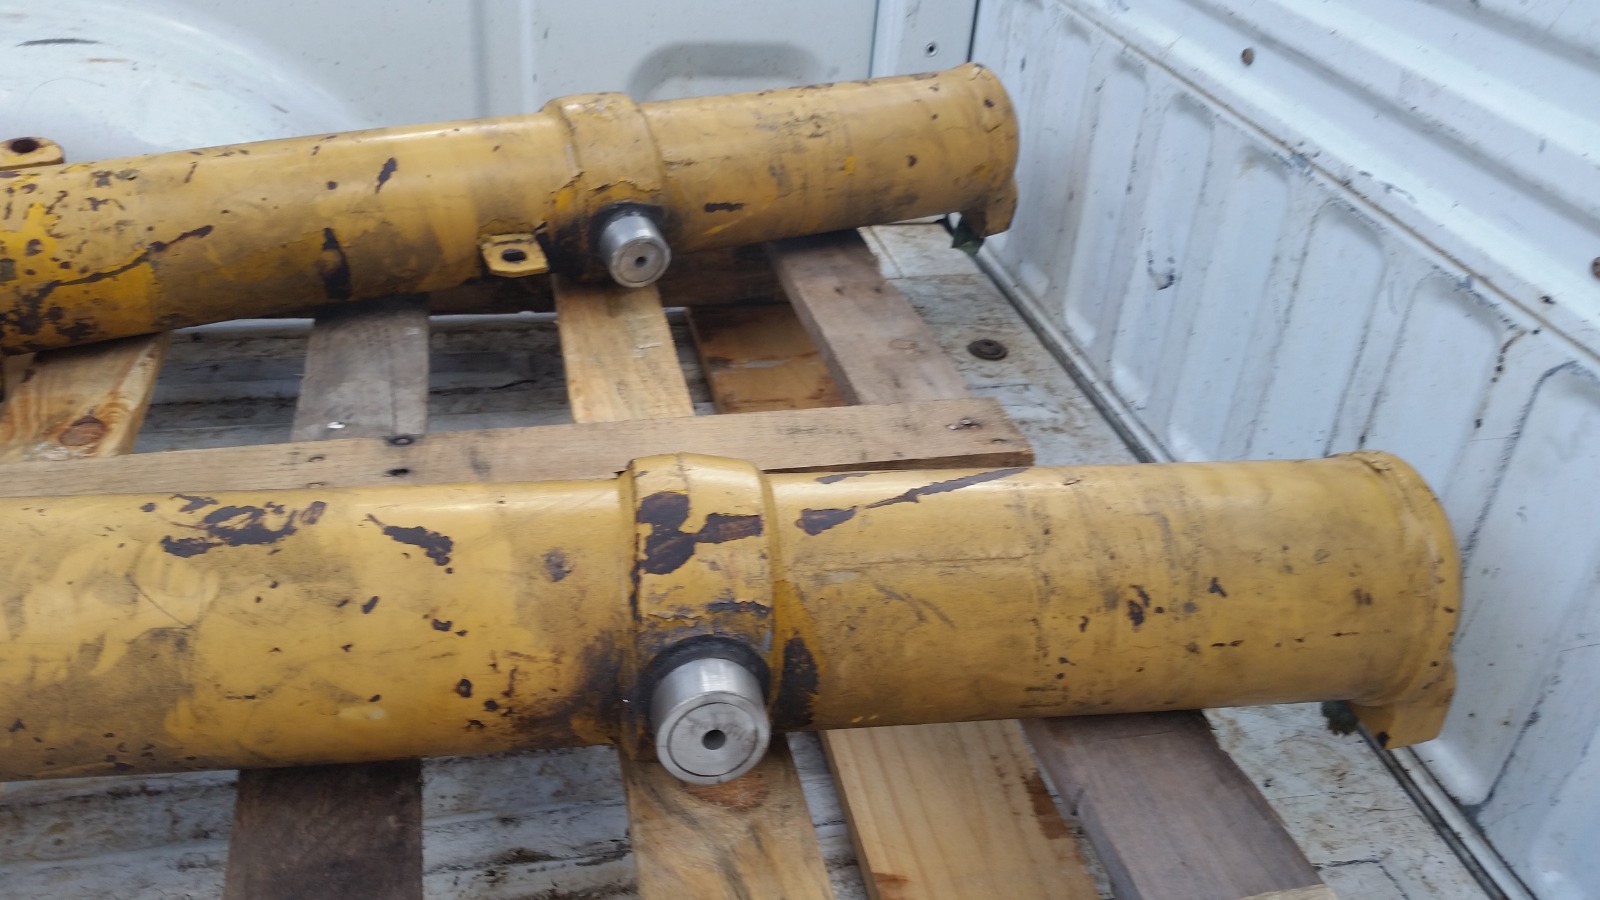
- Remove blade lift cylinders and hydraulic hoses, primarily to rebuild cylinders but also to give a little better access to work inside the engine bay
- Drop belly pan and clean out
- Clean all the crud off the engine and look for leaks (I already see some fuel leaking from one of the nuts attaching a fuel line to the fuel injection pump)
- Inspect brake bands and replace as necessary
- Adjust brake and steering clutch controls to specified limits
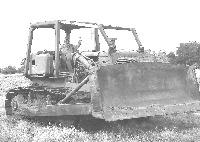
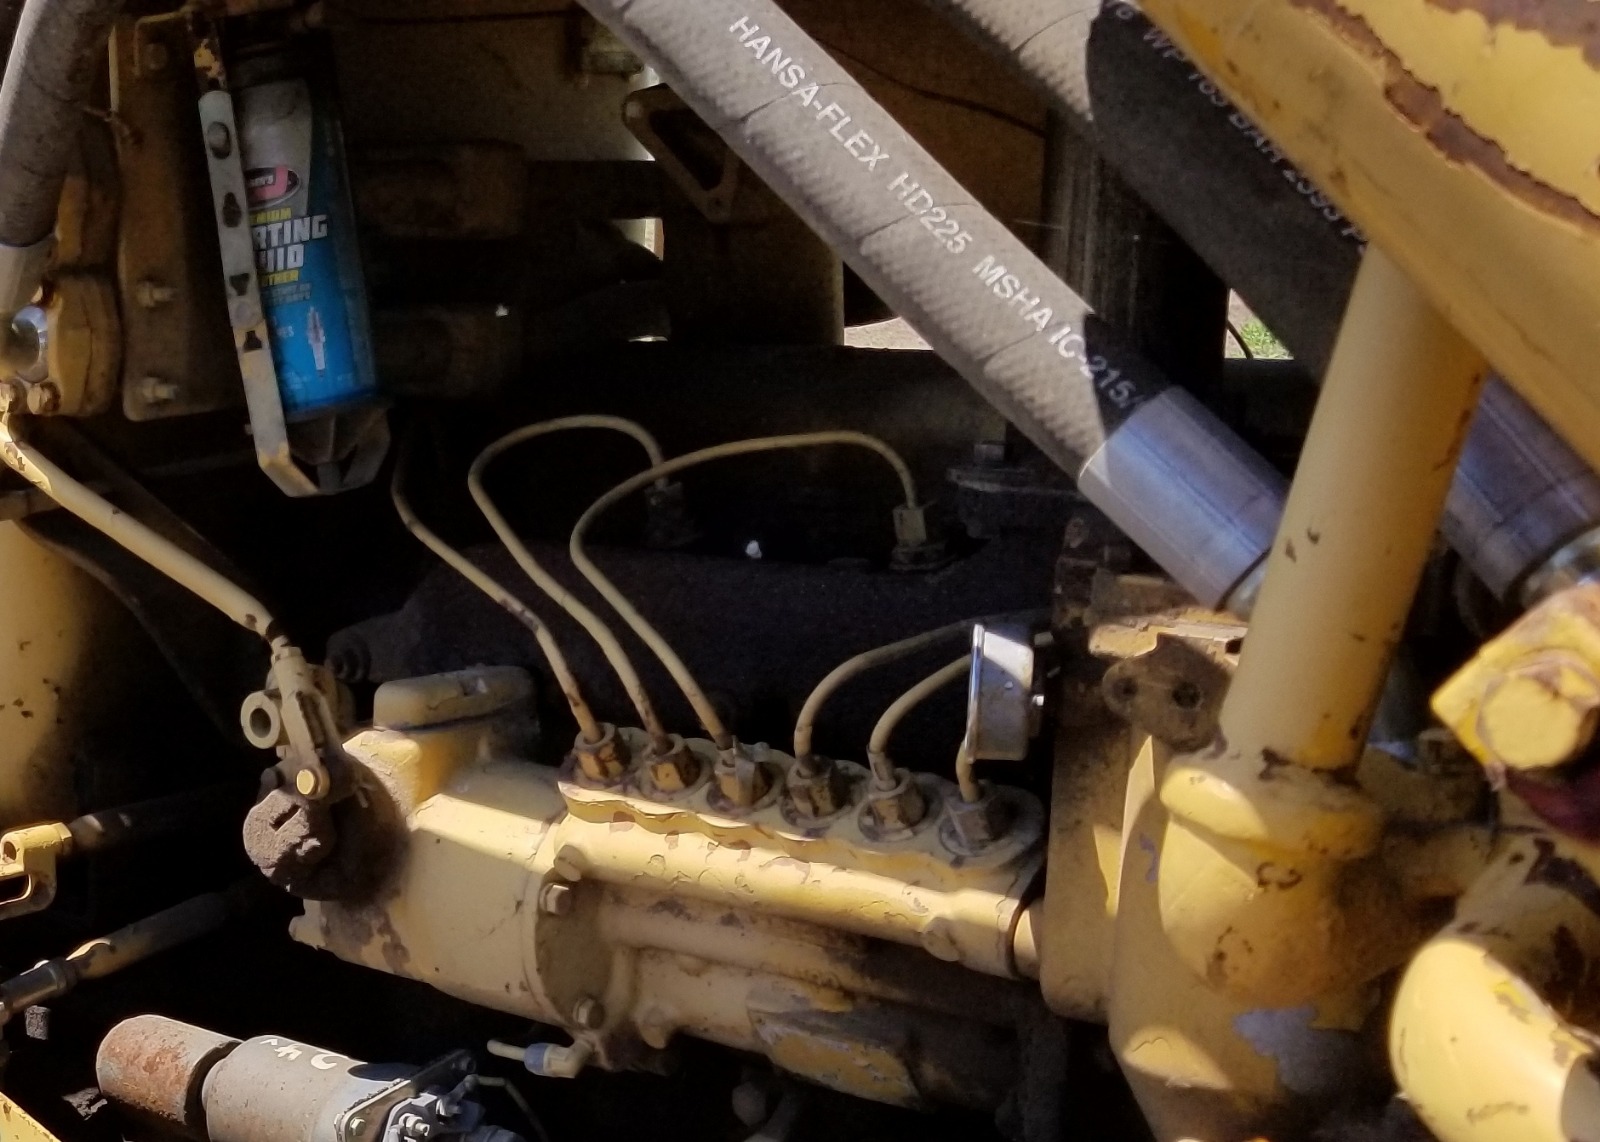
11/9/20 - Paint job started. All surfaces stripped with a wire wheel and wiped with solvent before priming, then paint, then top coat. Hydraulic hoses removed and system drained. Hoses will be remade at a local hydraulic hose shop this week. Got the cylinder rebuild kits but they seem to be for a ~2.5" rod which can't be right, this D6B has 2" rods in the lift cylinders.
When I got the dozer I was able to drive it to the place where it sits now, but barely. The brake pedals probably travel a foot or so before the dozer starts to turn, I see leaks of both oil and fuel coming from somewhere, and the blade lift cylinders literally pour oil. The wiring looks like a rat's nest, and there is reason to believe there has been a fire in the vicinity of the service hour meter on the fuel pump housing. The belly pan is so full of junk you can see it sneaking out between some of the body panels higher up. Besides that it hadn't seen a good paint job in probably 20-30 years.
To bring her back, I plan the following activities which I'll share pictures of as I go:
- Begin restoring paint, section by section
- Drain all lubricants, flush and replace. Crankcase, hydraulic, final drives, steering clutch, etc.
- Replace all filters
- Remove blade lift cylinders and hydraulic hoses, primarily to rebuild cylinders but also to give a little better access to work inside the engine bay
- Drop belly pan and clean out
- Clean all the crud off the engine and look for leaks (I already see some fuel leaking from one of the nuts attaching a fuel line to the fuel injection pump)
- Inspect brake bands and replace as necessary
- Adjust brake and steering clutch controls to specified limits
11/9/20 - Paint job started. All surfaces stripped with a wire wheel and wiped with solvent before priming, then paint, then top coat. Hydraulic hoses removed and system drained. Hoses will be remade at a local hydraulic hose shop this week. Got the cylinder rebuild kits but they seem to be for a ~2.5" rod which can't be right, this D6B has 2" rods in the lift cylinders.
Please Log in or Create an account to join the conversation.
- Old Magnet
-

- Offline
- Platinum Boarder
- Member
Less
More
- Posts: 16175
- Thank you received: 504
3 years 10 months ago #223488
by Old Magnet
Replied by Old Magnet on topic 1965 D6B Restoration Project
Get a part number off the lift cylinders, there are two different part number rods used.
Please Log in or Create an account to join the conversation.
3 years 10 months ago #223521
by seiscat
Replied by seiscat on topic 1965 D6B Restoration Project
The D6B introduced the new design lift cylinders, unfortunately Caterpillar had not yet thought to incorporate replaceable wear rings for the pivot bearings to ride on. We had a machine shop use a large "core-cutter" bit to cut the pivots down to a round shape and machine replaceable wear rings to fit the bearings.
Attachments:
Please Log in or Create an account to join the conversation.
- marbleknight
-
Topic Author
- Offline
- New Boarder
- User
Less
More
- Posts: 17
- Thank you received: 3
3 years 10 months ago #223522
by marbleknight
Replied by marbleknight on topic 1965 D6B Restoration Project
Thanks Magnet, I found the number 2J6380 on the cylinders and gave it to the local CAT dealer, but they told me they have to have the number off the hydraulic tank! I'll be interested to see what that number is when I drive back out there this evening.
Please Log in or Create an account to join the conversation.
- marbleknight
-
Topic Author
- Offline
- New Boarder
- User
Less
More
- Posts: 17
- Thank you received: 3
3 years 10 months ago #223523
by marbleknight
Replied by marbleknight on topic 1965 D6B Restoration Project
That's pretty awesome. I'll have to find a solution like this one because there is just nothing left of what must have been a bearing at some point, now it looks like a little sliver of metal between the pin and saddle.
Since you've probably run into the same thing I'll ask this question: Did you replace the hydraulic hoses? If so, did you have to buy the hose fittings from CAT? I'm looking for a source for those end fittings as the local shop said the ones they keep look different. They are tapered on the back side where the cap presses on the fitting whereas the original CAT ones are a simple 90 degree step design.
Since you've probably run into the same thing I'll ask this question: Did you replace the hydraulic hoses? If so, did you have to buy the hose fittings from CAT? I'm looking for a source for those end fittings as the local shop said the ones they keep look different. They are tapered on the back side where the cap presses on the fitting whereas the original CAT ones are a simple 90 degree step design.
Please Log in or Create an account to join the conversation.
- Old Magnet
-
- Offline
- Platinum Boarder
- Member
Less
More
- Posts: 16175
- Thank you received: 504
3 years 10 months ago #223529
by Old Magnet
Replied by Old Magnet on topic 1965 D6B Restoration Project
2J6380 doesn't match the parts book for a 44A blade. I show cylinders being 3J1717 & 3J1718 with the rods being 2J6369 and the later being 2J6370. This would be for a 16C1- 16C5000 blade s/n. Would help if you could find the blade s/n.
Please Log in or Create an account to join the conversation.
- marbleknight
-
Topic Author
- Offline
- New Boarder
- User
Less
More
- Posts: 17
- Thank you received: 3
3 years 10 months ago #223535
by marbleknight
Replied by marbleknight on topic 1965 D6B Restoration Project
Thanks Magnet. I'll see if I can find something on the blade. If these are not the original cylinders for this tractor it would explain why the seal kit I got doesn't fit. But for what it's worth, they look exactly like they should according to the parts diagrams. Every detail is the same, all the way down to the 2J3211 I-Plate attached to the cylinders.
Please Log in or Create an account to join the conversation.
3 years 10 months ago #223539
by d2gary
Replied by d2gary on topic 1965 D6B Restoration Project
Looks like a fun project, I like that you're putting it to work. Looking forward to the play by play restoration, keep the pictures coming.
Please Log in or Create an account to join the conversation.
3 years 10 months ago #223556
by seiscat
Replied by seiscat on topic 1965 D6B Restoration Project
Hello marbleknight, yes we had new hoses made by a hose shop (see photo). The hoses from Caterpillar were too expensive.
Attachments:
Please Log in or Create an account to join the conversation.
- marbleknight
-
Topic Author
- Offline
- New Boarder
- User
Less
More
- Posts: 17
- Thank you received: 3
3 years 10 months ago #223622
by marbleknight
Replied by marbleknight on topic 1965 D6B Restoration Project
11/14/20 - Dropped the belly pan and worked on getting a few more access panels open.
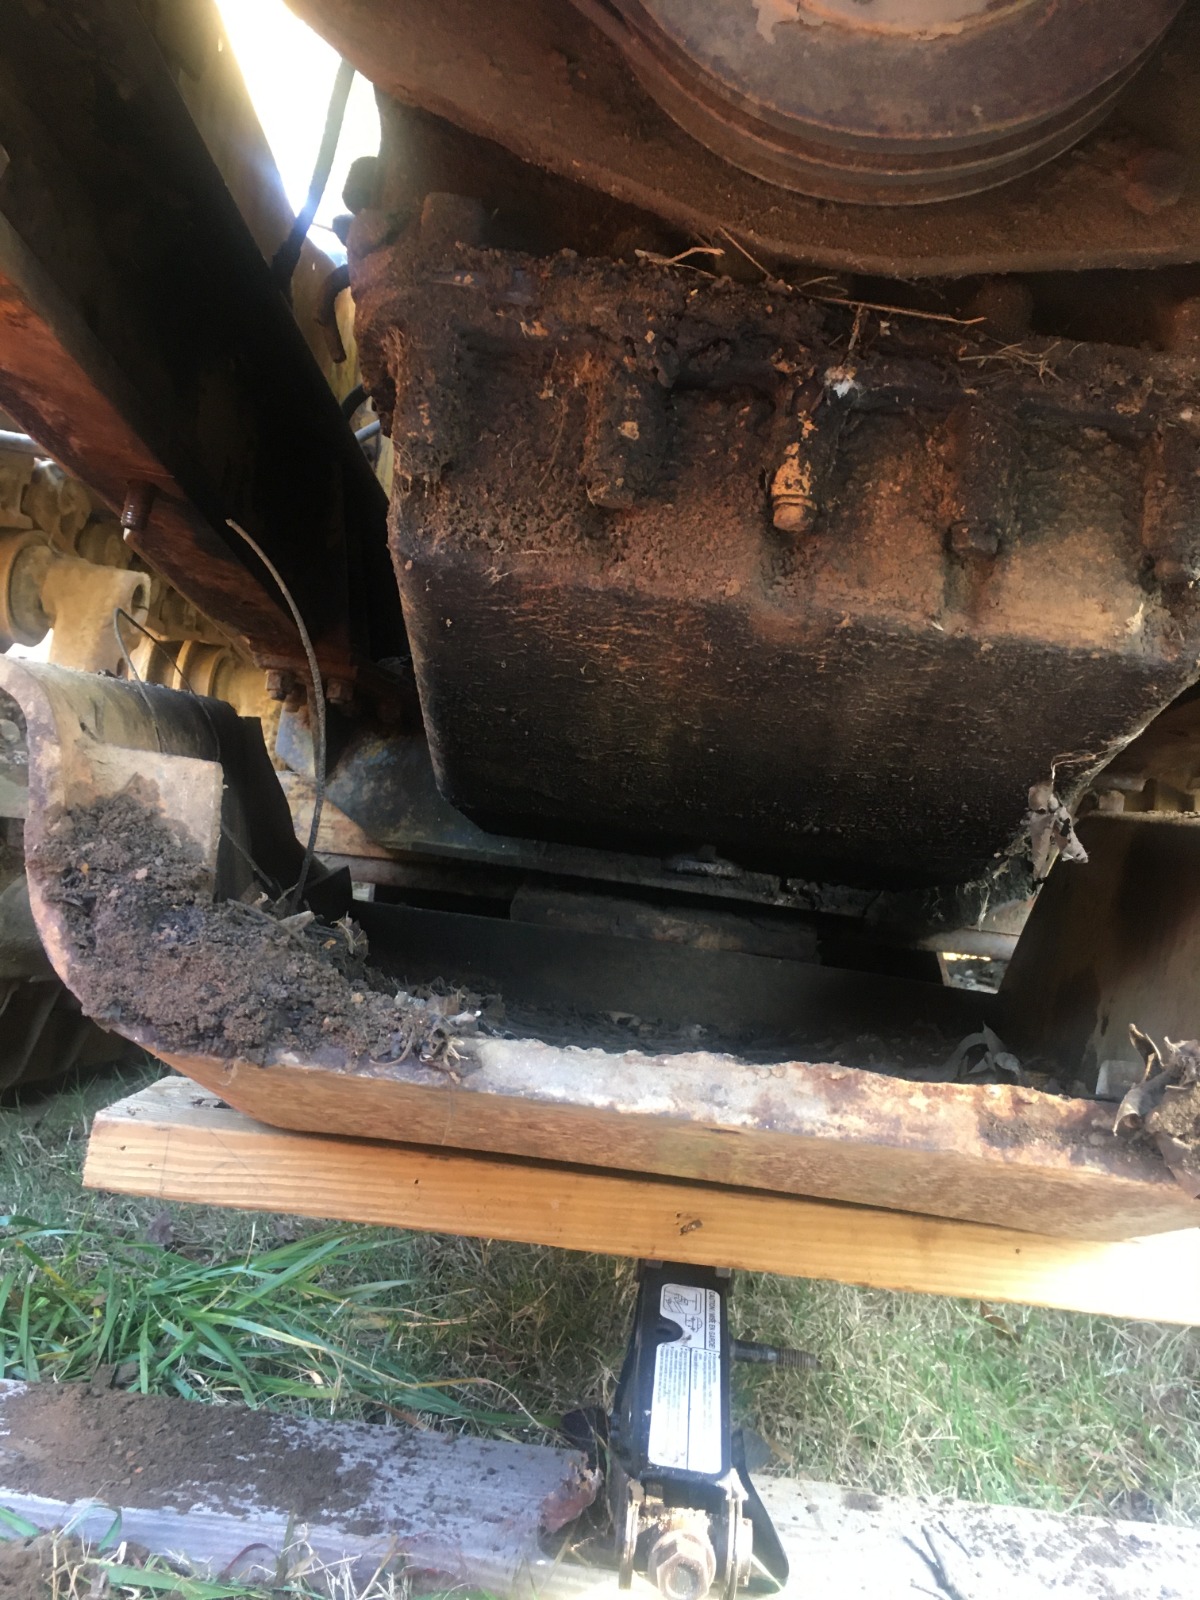
Most nuts and bolts are in bad shape; I've accepted that if I want to remove fasteners on this old machine I better start a few days ahead of time with the penetrating oil. Found that some hackjob without the proper tools has cut a slot all the way across the oil drain plug. I was barely able to use the correct hex bit because of the metal that has been pushed into the cavity. Anyway I got it out and all the oil will be allowed to drain for a few days.
The effort to get the hydraulic hoses remade has been greater than what I would have expected. Simply taking the old hoses to the hydraulic shops around here has not yielded the results I would have hoped for. One shop quotes as high as $1300 for all four hoses, another is around $800. I don't have that many hoses made except what I need for my tractors and they're nowhere near that expensive. I did the research and found out the fittings are not that bad to buy online, around $30 apiece (8 are needed). The hose is also not that bad per foot, around $5. So materials for the hoses is only about $300. I will likely buy the stuff and make them myself, taking the uncrimped hoses to a shop and just getting them to do that instead of paying their insane prices. Heck, if they agitate me enough I'll find a way to crimp them myself. The original hoses are held onto the fittings with bolt-on clamshells so it can't be that high of a pressure. Pretty sure these old machines employ high flow / low pressure; the opposite of today's machines.
Gonna clean everything in the engine compartment while the belly pan is off. It doesn't come off easily or often, are there other suggestions for stuff to do while it is off?
Attachments:
The following user(s) said Thank You: robclay
Please Log in or Create an account to join the conversation.
Time to create page: 0.213 seconds
ACMOC
Antique Caterpillar Machinery Owners Club
P.O. Box 9301
Peoria, IL 61612
(309) 691-5002
cat@acmoc.org
Become a Member!
"I became a member recently because the wealth of knowledge here is priceless."
- Chris R
"I also joined a year ago. had been on here a couple of times as a non-member and found the info very helpful so I got a one year subscription (not very expensive at all) to try it out. I really like all the resources on here so I just got a three year. I think its a very small price for what you can get out of this site."
- Jason N